Most local governments require air conditioner installations to be done by a licensed professional. HVAC professionals often get these permits for you, which helps keep the project moving quickly and smoothly.
Some experts recommend using a sealant to fill gaps between the AC and window after installation. This will prevent hot air and bugs from entering. Contact Air Conditioning Installation Los Angeles for professional help.
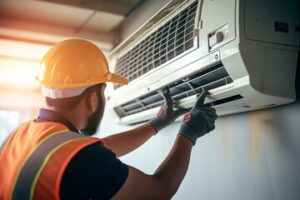
An air conditioning installation requires many steps to get it up and running, including sizing the unit for your home and determining the correct energy efficiency rating. An HVAC pro should also discuss how to use your air conditioner properly to minimize energy consumption, which helps you save on electricity costs. If you plan to buy an AC unit on your own instead of hiring a contractor for the installation, keep in mind that you’ll need to do the sizing yourself and will be responsible for any problems that may occur.
A common mistake made by homeowners is installing the indoor air conditioning unit outside. This can cause serious problems because the air conditioner needs to be located at a height where it can circulate cool air in your home, not heat it up.
The ideal location for an air conditioning unit is a spot 5 to 6 feet above the ground. This will ensure that the indoor unit can adequately cool your entire living space without cooling hot spots in the room. If the air conditioner is too low, it will not provide sufficient cooling and will force the system to run longer than necessary, which can add up to big energy bills.
In addition, it’s important to choose a place where the indoor air conditioning unit will be protected from direct sunlight. This will prevent the indoor unit from overheating and damaging its components. If possible, it’s best to install the air conditioner in a shady area with trees nearby. But if you can’t, make sure there are no branches or leaves that will fall onto the air conditioner and clog it.
If you’re planning on having a ductless mini-split installed, an HVAC professional will be able to help you determine the best placement for your home. They can give you specific advice on how the air conditioning unit will affect your energy efficiency and noise levels. For more information, call an authorised Daikin specialist dealer today.
Condenser Installation
The condenser is the workhorse of your air conditioning system. It’s where the “magic” happens, so to speak, cooling refrigerant over and over to provide your home with cool, refreshing air. The process begins when air from inside your home blows over a set of evaporator coils, absorbing the heat and turning it into low-pressure refrigerant. This refrigerant is then sent to the compressor, where it’s packed together much more tightly. This process also raises the temperature of the refrigerant, which helps it become a liquid again so that it can return to the evaporator coils. From there, the refrigerant absorbs more heat from the air in the evaporator coils and repeats this whole process over again.
Because the condenser is outside, it must be placed in a location that’s well away from traffic areas and dusty environments. Additionally, it’s important that the unit isn’t in direct sunlight, which could lead to overheating. The location should also be stable enough to support the unit and high enough that children won’t be able to reach it.
Once the condenser is in place, an installer will connect it to the air conditioner using a line set. The line set is a series of tubing that runs from the outdoor unit to the indoor air handler or thermostat, depending on your home’s configuration. The installer will start by installing hangers, which are small metal hooks that the line set will connect to. Then, the installer will roll out a section of the line and push it through a hole that was previously drilled for the indoor air handler. They’ll make sure to use the shortest tubing possible, as any additional length can increase pressure loss and decrease the efficiency of your system.
Because the air conditioning installation process is so complex and involves working with dangerous electrical components and refrigerant, it’s strongly recommended that you have a professional AC company perform it for you. Not only will this help ensure that the installation goes smoothly, but it’ll also protect you from potential damages and safety hazards.
Ductwork Installation
Ducts transport cool air from the condenser to your home’s rooms. The best ducts are well-insulated and properly sealed to limit energy loss. Leaky ducts waste 25-40% of the heating and cooling energy put out by your system, and they increase your utility bills.
During the in-home visit, the contractor will review your current ductwork to determine if it needs replacing or can be modified. If they determine that the ductwork will need to be replaced, the contractor will work with you to create a new layout of ductwork and a schedule for installation.
If you’re planning on using your existing ductwork for your air conditioning installation, you should write out a diagram of where you want the supply and return ducts to go in each room. Your contractor will use this information to make sure that the ducts are sized correctly and are in a good location to serve your home.
It’s also important to have the ductwork professionally cleaned before installing it in your home. Dust and other debris can clog your vents and reduce the efficiency of your system. A professional duct cleaning service will remove any dust, dirt or debris from the interior of your ducts and vacuum the vents to get rid of any lingering particles.
A duct cleaning company can also help you seal your ductwork. The seams should be taped or caulked to prevent air leakage. If you’re taping the seams, make sure to use duct tape with a good bond. Inspectors will look for this type of tape, so you should use it if you want to avoid any unnecessary inspections.
If your house has a crawl space or attic, it’s best to bring in a specialist to install the ductwork. A ductwork specialist will be able to install an efficient system in even the most difficult areas of your home. They’ll know how much ductwork you need, how to seal the joints and what materials to use to ensure an energy-efficient system. They can also help you select the right air conditioner for your home, provide a written estimate and offer affordable financing.
Thermostat Installation
Thermostats have become more advanced than ever before. From smart thermostats to Nest learning models, the range of choices is staggering and the benefits are numerous. Your HVAC professional will help you determine what features are most important to your household and your budget. Once you’ve decided on the model, your technician will install it in the appropriate location in your home. Thermostat installation will require the power to be turned off, so make sure the breakers are turned off in your home before beginning.
To begin, remove the old faceplate from your thermostat. It should pop off easily, but if it doesn’t, don’t force it; you could damage your thermostat and cause an electrical hazard. After removing the plate, take a picture of the wiring setup with your smartphone or camera, and label each wire with masking tape or a labeler (most new thermostats come with wire labels). This will make it much easier to connect the new unit later on.
Next, disconnect the low-voltage wires from the old thermostat. It’s best to use a wire stripper to remove the insulation, leaving only 1/4 inch of exposed wire to prevent over-heating and shorting out the terminals on the thermostat. Then, using your photo or notes, connect each wire to the proper terminals on your new thermostat. Be sure to consult your new thermostat’s installation manual for specific wiring instructions, as each brand is a little different.
If you have a new thermostat that requires a C-wire for its smart functions, be sure to connect the white, W, or W1 wire to the C terminal on your HVAC system’s service disconnect. Be sure to also reconnect the Y wire to the Y terminal on your new thermostat if your heating and cooling systems are set up with two-stage operation.
Once all the wires are connected, screw your new thermostat to its base and mount it on the wall. Ensure the unit is level to avoid inaccurate readings. Once everything is secure, turn the breaker back on in your home and start saving money on energy costs.